| Permalink: |
How to make a screenshot
A screenshot is an image made by your computer and showing exactly what a user sees on the screen.
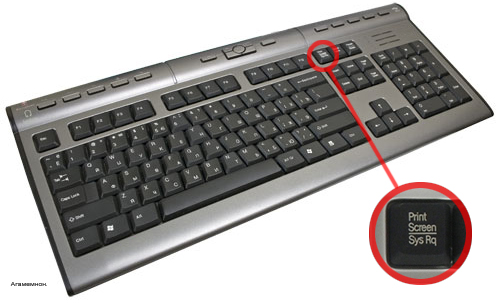
The easiest and fastest way to make a screenshot in Microsoft Windows is to press the Print Screen key when you need to (see the figure) thus making your computer store the information displayed on the screen at that precise moment.
If you want to store the image of only one window, click the window to make it active, and press alt+ Print hotkey (see the figure).
Next, you have to edit and save this image using any graphics editor. An easy-to-use graphic editor is Microsoft Paint (Paintbrush) that is available on the standard Windows software package. To run the Paint software, click Start – Run, type pbrush and click OK.
In Paint, click Edit – Paste. If the software displays a question about the image size, click “Yes”. After that the software window displays the image showing your screen at the moment you pressed Print Screen.
Next click File – Save menu to save the image. In the opened window, specify the file location, the file name and its type. Please note that the file size depends on the file type. It is recommended to choose JPEG if this type is available. The output file with a graphic image is your screenshot.
If you need the screenshot to resolve any technical issues, do not cut the image while editing, since the full screenshot displaying all system information is required.